Custom Controls for Construct 3
_____________________________________
About
_____________________________________
This is a Construct 3 template project. You can either use it as a start point for your game or you can merge it with your project using Construct 3 Project Merger.
Custom Controls for Construct 3 is a template project that contain functions that makes it easier to manage:
- Multiple inputs sources (Keyboard, Mouse and Gamepad);
- Multiple player controls (up to as much construct will support handling);
- Reasignable inputs with persistent data;
_______________________________________
How to use it
_______________________________________
Setting up the project
Start a new project using the attached "Custom Controls by Relixes vx.x.x.c3p" file in this page or merge this template with your project using Construct 3 Project Merger.
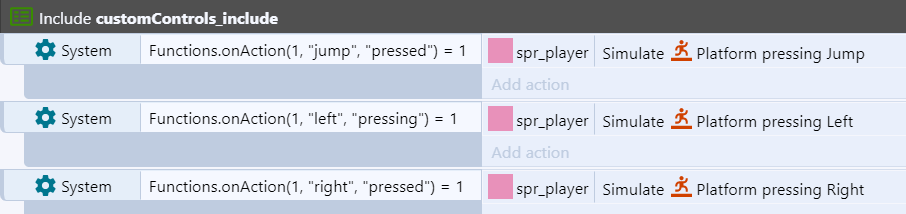
Include the "customControls_include" event sheet into your main event sheet file and use the construct functions inside it as you wish. For more info about the available functions see the Custom Controls Functions section.
The "relixesControls_config.json" file
The number of controls, the actions and the default inputs for your game are defined in the "relixesControls_config.json" file a.k.a. config file. You can find this file browsing through Construct 3 'Project" bar, under the 'Files' folder. The config file is essentialy a C3 array object that is loaded during runtime.
It's important to know how the template uses this file if you want to customize your project. Bellow we'll see what some important and recurrent therms mean and how you can take advantage of editing the config file to custom your controls:
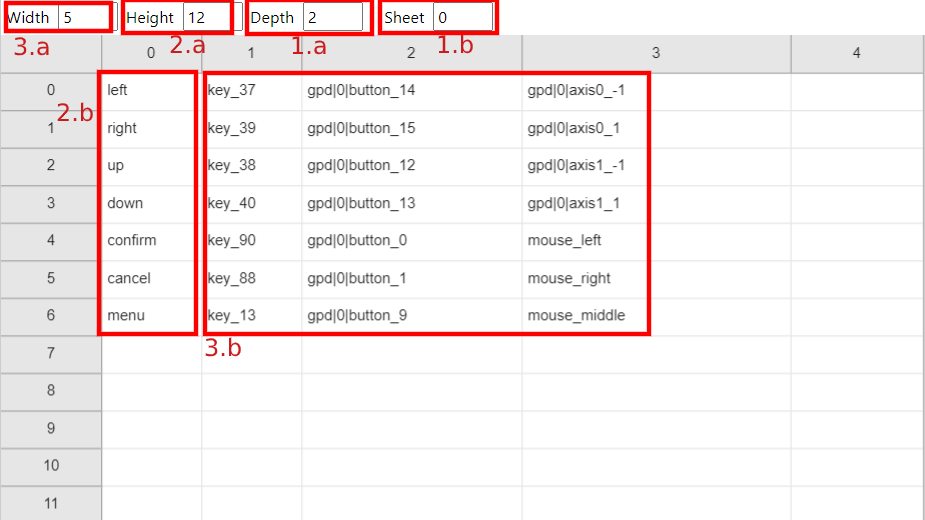
- [Controls] - Control is the therm used for the object that unify inputs from diferent sources (Keyboard, Gamepad and Mouse) through actions. So instead of referencing to the C3 standard plugins, the Custom Controls project uses the therm "Controls". A project can have multiple controls and you reference them by their index. Control indexes starts with 1, the 0 (zero) index is reserved to reference any controls in the pre defined Custom Control Functions. The number of available controls in the game is defined by the "Depth" property in the config file [IMG1-1.a], so you can increase or decrease its value to change the number of controls available. Each control will have it's own colection of actions and default inputs assigned to it, those are the default values for the controls if you don't have saved any changes made to inputs during runtime with the "Save controls data" action function. You can change the controls you're editing actions and inputs by changing the current sheet in this file [IMG1-1.b]. The sheet 0 will be related to the control with index 1, the sheet 1 will be related to the control with index 2 and so on...
- [Actions] - Each control have it's own list of actions assigned to it. You can check for actions states using the Custom Controls functions in event shets. The max number of actions for the controls is defined by the "Height" property of the config file [IMG1-2.a]. Actions are strings that are defined in the first column of each control sheet[IMG-2.b]. The colection of actions are individual for each controls, but it's recommended to have equivalents set of actions for each controls to keep the consistency between them. Each action has a list of inputs code that are defined on the same row that the action is in, starting from column with index 1 (second column)[IMG1-3.b]. The number of max input codes available to actions is defined by the "Width" property of the config file [IMG1-3.a]. The action state for a control will change depending on the state of the plugins (Keyboard, Gamepad and Mouse) related to the inputs code list.
- [Inputs code] - A input code is a string that connects actions states to the state of the native Construct 3 plugins (Keyboard, Gamepad and Mouse). You can check input codes for any supported plugin by just previwing the debug layout that comes with the template project and pressing any command there (we'll see more about the debug layout in the next session). Input codes have pre-defined names depending on the plugin you want to reference
- Keyboard input code - Starts with "key_" followed by the keyboard key code.
- Ex: "key_39" will reference the right arrow from the keyboard.
- Mouse input code - Starts with "mouse_" followed by:
- "left" - for clicks with the left button
- "right" - for clicks witht he right button
- "middle" - for clicks with the middle button
- "up" - for scrolling up with the mouse
- "down" for scrolling down with the mouse
- Ex: "mouse_left" will reference the left button click with the mouse
- Gamepad input code - starts with "gpd|INDEX|TYPE_" where "INDEX" is the 0 based index of the Gamepad plugin and "TYPE" can be either "button" to check for button presses or "axisN" to check for axis command where "N" is the 0 based index of the gamepad axis. If "TYPE" is "button", the code is followed by the 0 based index code of the gamepad buttons. If "TYPE" is "axisN" the code is followed by either "-1" to check for negative moviment values for the axis or "1" to check for positive values moviment for it.
- Ex1: "gpd|0|button_0" will reference the first available gamepad and the "A button"when mapped to a XBOX 360 controller.
- Ex2: "gpd|1|axis0_1" will reference the second available gamepad and the "Right" direction for the left stick when mapped to a XBOX 360 controller.
- Keyboard input code - Starts with "key_" followed by the keyboard key code.
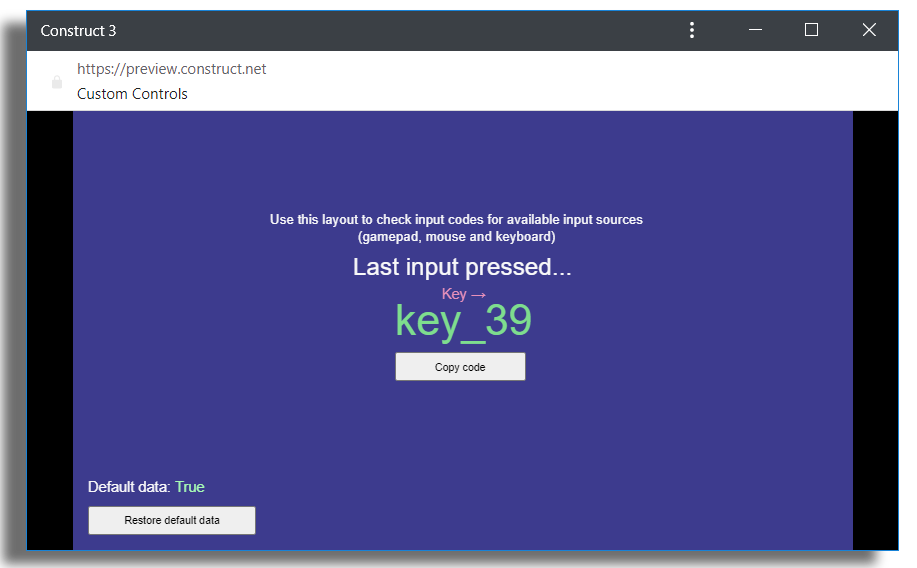
The debug layout
The Custom Controls template comes with a debug layout named "customControls_debug". You can preview it to:
- Easily check for input codes for a input for supported devices to place them in the condig file as default inputs
- Delete any perssistent data saved using the "Save controls data" action function.
Support
If you're having problems with the template reach for help in the officinal Construct 3 Project Merger discord server(I'll be there myself to help).
_______________________________________
Custom Constrols Functions
_______________________________________
Those functions are available after including the cuscomControls_include sheet.
Action functions
Those functions are available to use as actions under the category "Custom controls" under the Functions plugin. Action functions doesn't return values.
- [Set default controls]
- Parameters:
- None
- Description: Reset the controls to the default values seted in the config file and remove data related to the custom controls on the localstorage.
- [Set action input code]
- Parameters:
- number control_index - Index of the control to reasign input. Index starts from 1
- string action_name - Name of the action to reasign code
- number input_index - Index of the input to reasign. Indeex starts from 0
- string input_code - Input code to reasign
- Description: Set a new code for a input index to a control. This is useful to easilly reasign keys for custom controls. If the input_code value is already in use by any other input of any action it'll be swaped with the current input code value in the targeted input_index and action_name given
- [Enable controls]
- Parameters:
- None
- Description: Enable controls actions
- [Disable controls]
- Parameters:
- None
- Description: Disable controls actions
- [Save controls data]
- Parameters:
- None
- Description: Saves all controls data into into the localstorage "relixesControls" key. This is usefull to keep any changes to the default input values seted in the config file with the "Set action input code" action
Expression functions
Those functions are available to use as expressions using the "Functions" prefix anywhere you could use a expression. Expressions functions always returns a value.
- [Functions.isControlsReady]
- Parameters:
- None
- Descriptions: Returns 1 if the controls have been loaded and are ready to use. Returns 0 otherwise
- [Functions.isControlsEnabled]
- Parameters:
- None
- Description: Returns 1 if the controls are enabled. Returns 0 otherwise.
- [Functions.onAction]
- Parameters:
- number control_index - Set the value of the control index that you want to check the input. Controls index starts at 1. If this parameter is seted as 0 this will check for actions for all controls.
- string action - Name of the action to check if there are inputs feedback
- strnig state - "pressed", "pressing" or "released"
- Description: Return 1 if the action is in the requested state for the control_index. Return 0 otherwise
- [Functions.onAnyAction]
- Parameters:
- number control_index - Set the value of the control index that you want to check the input. Controls index starts at 1. If this parameter is seted as 0 this will check for actions for all controls.
- string state - "pressed", "pressing" or "released"
- Description: Return 1 if the any action is in the requested state for the control_index. Return 0 otherwise
- [Functions.onAnyInputPressed]
- Parameters:
- None
- Description: Returns 1 on any input pressed. Returns 0 otherwise
- [Functions.getActionValue]
- Parameters:
- number control_index - Set the value of the control index that you want to check the input. Controls index starts at 1.
- string action - Nname of the action to check if there are inputs feedback.
- Description: Return the number of frames since this action has been pressed for the last time. Returns -1 if this acion was relesead during the current frame
- [Functions.getActionList]
- Parameters:
- number control_index - The number of the control to get the action list for (index starts at 1)
- Description: Gets a list of actions for a control. Returned value is a string separeted by ";"
- [Functions.getActionInput]
- Parameters:
- number control_index - Control index you want to get the input code from. Index starts at 1
- number input_index - index of the input to get the code. Index starts at 0
- string action - name of the action to check to get the input code
- Description: Gets the input code from givem control, and action and input index
- [Functions.getLastInput]
- Parameters:
- None
- Description: Gets the code from the last input pressed on any supported control type (mouse, keyboard and gamepad)
- [Functions.controlsCount]
- Parameters:
- None
- Description: Return the number of controls defined in the config file
- [Functions.getFormatedInput]
- Parameters:
- string input - input code to translate into a more readable format
- Description: Return a more readable formated string of a input code (gamepad formated input is mapped using a xbox 360 controller)
Download
Click download now to get access to the following files:

Comments
Log in with itch.io to leave a comment.
I've come across and issue when using a controller and the 8Direction Behavior.
The movement always seems to be diagonal. Even the slightest hint of degree off 0, 90, 180, or 270 sets the movement diagonal. It seems to be a deadzone problem.
This is usually fixed by the gamepad's deadzone, though when I change it now it doesn't seem to make a difference unless I do "0" or "101".
I see there is "gpd_deadzone" which is default to .25. I've set this to 0, 1, 100, 10000, -.25, -1, and see no difference. It always works the same. I've also tried changing both the gamepad's deadzone and the "gpd_deadzone" to a bunch of different and matching numbers but it always comes back the same.
From what I can tell, the Custom Controls doesn't seem to read the "gpd_deadzone" variable, which makes using a joystick impossible properly use.
I did try other movement behaviors to this, and while it does control a little better with free 360 degree movement, the player still faces diagonals, meaning it still doesn't read the deadzone.
Any potential solution for this deadzone issue? Everything else about this is working amazingly.
Awesome this might be the help I needed for my fighting game!